Jash Naik
Imagine building an AI assistant that can actually read your documents, edit files, and remember context between conversations. Not just another chatbot, but an AI that has real capabilities. Today, we’re building exactly that using the Model Context Protocol (MCP), LangChain, and Google’s Gemini models.
- Interactive CLI chat application
- AI that reads and manages documents
- Auto-completion and intelligent suggestions
- Real-time streaming responses
- Complete MCP implementation from scratch
Understanding MCP: The Foundation
Before diving into implementation, let’s understand what makes MCP special. The Model Context Protocol isn’t just another API - it’s a standardized way for AI models to interact with external systems, data, and tools in a structured, secure, and scalable manner.
Core Components
Resources: Read-Only Data Access
Resources are your AI’s window to external data. Think of them as read-only endpoints that provide structured access to information:
- Documents: PDFs, text files, databases
- APIs: External services, web endpoints
- File Systems: Directory listings, file contents
- Real-time Data: Sensors, live feeds, system metrics
Resources use URI patterns like file:///documents/{id} or api://weather/{location} to provide consistent, discoverable access to data.
Tools: Functions AI Can Execute
Tools are the AI’s hands - functions it can call to perform actions:
- File Operations: Create, edit, delete files
- API Calls: Send requests, process responses
- System Commands: Execute shell commands, manage processes
- Data Processing: Transform, analyze, visualize data
Each tool has a clear schema defining inputs, outputs, and behavior, making them reliable and predictable.
Prompts: Templates for Consistency
Prompts provide reusable templates that ensure consistent AI behavior:
- System Prompts: Define AI personality and behavior
- Task Templates: Structured approaches to common tasks
- Output Formats: Ensure consistent response formatting
- Context Injection: Add relevant context to conversations
Advanced Features
Sampling and Progress Notifications
MCP supports advanced interaction patterns:
- Sampling: AI can request specific data samples for analysis
- Progress Tracking: Long-running operations can report status
- Notifications: Real-time updates about system changes
- Cancellation: Graceful handling of interrupted operations
Roots: Security and Access Control
Roots define the boundaries of what AI can access:
- File System Roots: Limit access to specific directories
- API Scope: Control which endpoints are available
- Permission Levels: Define read/write access patterns
- Security Policies: Implement access control and auditing
Transport and Communication
JSON Message Types
MCP uses structured JSON messages for all communication:
{
  "jsonrpc": "2.0",
  "method": "tools/call",
  "params": {
    "name": "read_document",
    "arguments": {"doc_id": "report.pdf"}
  }
}
This ensures type safety, versioning, and clear error handling across all interactions.
Stdio Transport: Simple and Reliable
The stdio transport uses standard input/output streams:
- Process-based: Each MCP server runs as a separate process
- Isolation: Servers can’t interfere with each other
- Reliability: Built-in process management and error recovery
- Simplicity: No network configuration or port management needed
Streamable HTTP Transport: Solving HTTP’s Shortcomings
While HTTP is ubiquitous, it has limitations for AI interactions:
Traditional HTTP Issues:
- Request/response only - no server-initiated communication
- No built-in streaming for long-running operations
- Complex state management across multiple requests
- Timeout issues with lengthy AI processing
MCP’s HTTP Solution:
- Server-Sent Events (SSE): Real-time progress updates
- Persistent Connections: Maintain state across interactions
- Chunked Responses: Stream results as they’re generated
- Bidirectional Communication: Servers can notify clients of changes
This creates a more natural interaction pattern for AI applications, where operations might take time and progress needs to be communicated.
State Management
MCP handles complex state scenarios:
- Session State: Maintain context across multiple interactions
- Resource State: Track changes to external data sources
- Tool State: Manage ongoing operations and their progress
- Error Recovery: Graceful handling of connection issues and failures
What We’re Building
Before we start, make sure you have:
- Python 3.10+ installed
- uv package manager (install here)
- Google API key for Gemini (get one here)
- Google Application Credentials (get one here)
- Node.js 18+ for the MCP Inspector tool
We’ll use uv throughout this tutorial as it provides fast, reliable package management and makes our MCP setup much smoother.
Creating the Core Features
Let’s start by building the heart of our application - the chat system that will eventually connect to our MCP server. We’ll begin with a simple version and progressively add more capabilities.
Make sure to enable the Google Generative AI API in your Google Cloud Console for Gemini access. and export your GOOGLE_API_KEY and GOOGLE_APPLICATION_CREDENTIALS in your environment variables.
First, let’s set up our project:
# Create project directory
mkdir mcp-chat-app && cd mcp-chat-app

# Initialize with uv
uv init .

# Add our dependencies
uv add langchian langchain-mcp-adapters langgraph langchain-google-genai mcp python-dotenv
What’s happening here:
-
uv init .: Initializes a new Python project withuv, creating apyproject.tomlfile and basic project structure. We useuvbecause it’s significantly faster than pip, provides better dependency resolution, and handles virtual environments automatically. -
langchain: The core library for building LLM applications. It provides abstractions for messages, agents, and chains. -
langchain-mcp-adapters: This is the bridge that connects MCP servers to LangChain. It automatically converts MCP tools and resources into LangChain-compatible tools that can be used by agents. -
langgraph: A library for building stateful, multi-actor applications with LLMs. We use it to create a ReAct (Reasoning and Acting) agent that can think, use tools, and respond intelligently. -
langchain-google-genai: Official LangChain integration for Google’s Gemini models. This provides the core language model capabilities with streaming support. -
mcp: The core Model Context Protocol library that handles client-server communication, message serialization, and transport management. -
python-dotenv: Loads environment variables from.envfiles, keeping API keys and configuration separate from code.
Now let’s create our basic chat system:
import os
from langchain_core.messages import BaseMessage, HumanMessage
from langgraph.prebuilt import create_react_agent
from langchain_google_genai import ChatGoogleGenerativeAI
from langchain_mcp_adapters.tools import load_mcp_tools

class Chat:
    def __init__(self, clients: dict = None):
        self.clients = clients or {}
        self.messages: list[BaseMessage] = []
        self.agent = None

    async def initialize_agent(self):
        # Start with no tools - we'll add MCP tools later
        tools = []

        # Load MCP tools if we have clients
        for client in self.clients.values():
            tools.extend(await load_mcp_tools(client.session()))

        # Initialize Gemini
        gemini_model = os.getenv("GEMINI_MODEL", "gemini-2.5-pro")
        llm = ChatGoogleGenerativeAI(model=gemini_model)

        # Create ReAct agent
        self.agent = create_react_agent(llm, tools)

    async def run(self, query: str):
        if not self.agent:
            await self.initialize_agent()

        self.messages.append(HumanMessage(content=query))

        async for event in self.agent.astream_events(
            {"messages": self.messages}, version="v1"
        ):
            yield event
Breaking Down the Chat Class
Initialization (__init__)
self.clients: Holds MCP clients for different servers (docs, APIs, etc.).self.messages: Stores conversation history using LangChain messages.self.agent: The ReAct agent, created only when needed to save resources.
Agent Setup (initialize_agent)
- Tools:
load_mcp_tools()turns MCP server features into LangChain tools the agent can call like functions. - Model: Spins up a Gemini model with streaming and config options.
- ReAct Agent: Combines reasoning + acting. The agent:
- Figures out which tool to use
- Calls it
- Looks at the result
- Repeats until done
Query Processing (run)
- Lazy Start: The agent only loads when you actually use it.
- Conversation Flow: Each user query becomes a
HumanMessagein history. - Streaming:
astream_events()shows the agent’s step-by-step process — tool calls, results, reasoning, responses, and even errors.
This architecture creates a conversational agent that can maintain context, use tools intelligently, and provide real-time feedback about its reasoning process.
Simple CLI Interface
Let’s create a basic CLI that we can test our chat system with, including detailed explanations of how real-time streaming works:
import asyncio
import os
from dotenv import load_dotenv
from core.chat import Chat

load_dotenv()

async def main():
    chat = Chat(clients={})  # No MCP clients for now

    print("🤖 Basic Chat Ready! (No MCP tools yet)")
    print("Try: 'Hello, how are you?'")
    print("Type 'quit' to exit\n")

    while True:
        try:
            user_input = input("> ").strip()

            if user_input.lower() in ['quit', 'exit']:
                break

            if not user_input:
                continue

            print("\nAI: ", end="", flush=True)
            async for event in chat.run(user_input):
                if event.get("event") == "on_chat_model_stream":
                    chunk = event.get("data", {}).get("chunk")
                    if chunk and hasattr(chunk, 'content'):
                        print(chunk.content, end='', flush=True)
            print("\n")  # New line after response

        except KeyboardInterrupt:
            break

    print("👋 Goodbye!")

if __name__ == "__main__":
    asyncio.run(main())
Understanding CLI Event Processing
Async Event Loop (asyncio.run(main()))
- Runs Python’s async runtime for concurrent operations.
- Keeps the interface responsive while the AI processes in the background.
- Enables real-time streaming without blocking.
Input Processing Loop
- Handles input: Validates commands and user input.
- Exit conditions: Clean shutdown on
quitorCtrl+C. - Filters blanks: Skips empty inputs to avoid wasted API calls.
Real-time Streaming (async for event in chat.run(user_input))
Instead of waiting for a full response, events stream in as they happen:
on_chat_model_stream: Text chunks from the model.on_tool_start: Tool begins execution.on_tool_end: Tool finishes execution.on_agent_action: Agent decides on the next move.
Chunk Processing Example
if event.get("event") == "on_chat_model_stream":
    chunk = event.get("data", {}).get("chunk")
    if chunk and hasattr(chunk, 'content'):
        print(chunk.content, end='', flush=True)
Create a .env file with your Google API key:
GOOGLE_API_KEY=your_google_api_key_here
GEMINI_MODEL=gemini-2.5-pro
GOOGLE_APPLICATION_CREDENTIALS=path_to_your_service_account_json_file
Now you can test the basic chat:
uv run main.py
Basic chat with no tools
Great! We have a working chat, but it’s just a regular AI - no special capabilities yet. Let’s add MCP to give our AI some superpowers.
Building the MCP Server
Now we’ll create an MCP server that manages documents and provides tools for our AI to use. This is where the magic happens - we’re creating a service that exposes capabilities to AI agents:
from mcp.server.fastmcp import FastMCP
from pydantic import Field

# Initialize MCP server
mcp = FastMCP("DocumentMCP", log_level="ERROR")

# Simple document storage (in production, use a database) essentially resources
docs = {
    "report.pdf": "The report details the state of a 20m condenser tower. Current efficiency is at 87% with potential improvements identified.",
    "financials.docx": "Q3 financials show revenue growth of 23% compared to last quarter. Operating expenses increased by 12%.",
    "plan.md": "Project implementation plan: Phase 1 (Q1): Infrastructure setup. Phase 2 (Q2): Core development. Phase 3 (Q3): Testing and deployment.",
    "notes.txt": "Meeting notes from Nov 15: Discussed budget allocation, timeline adjustments, and resource requirements for upcoming phases."
}

@mcp.tool(
    name="read_doc_contents",
    description="Read the contents of a document and return it as a string."
)
def read_document(doc_id: str = Field(description="Id of the document to read")):
    """Read a document by its ID"""
    if doc_id not in docs:
        raise ValueError(f"Document {doc_id} not found")
    return docs[doc_id]

@mcp.tool(
    name="edit_document",
    description="Edit a document by replacing text"
)
def edit_document(
    doc_id: str = Field(description="Id of the document to edit"),
    old_text: str = Field(description="Text to replace"),
    new_text: str = Field(description="New text to insert")
):
    """Edit a document by replacing old text with new text"""
    if doc_id not in docs:
        raise ValueError(f"Document {doc_id} not found")

    if old_text not in docs[doc_id]:
        raise ValueError(f"Text '{old_text}' not found in document {doc_id}")

    docs[doc_id] = docs[doc_id].replace(old_text, new_text)
    return f"Successfully updated {doc_id}"

if __name__ == "__main__":
    mcp.run(transport="stdio")
Understanding the MCP Server Architecture
FastMCP Framework (FastMCP("DocumentMCP", log_level="ERROR"))
- Identifies the server as
"DocumentMCP". - Logs only errors to cut noise.
- Auto-discovers decorated functions as MCP tools.
- Works with stdio, HTTP, or other transports.
Document Storage (docs dictionary)
- Uses a simple in-memory dict for demo purposes.
- Keys = document IDs, values = content.
- Mimics real business data.
- Can be swapped for a database or external storage.
Tool Decorators (@mcp.tool())
Turns Python functions into AI tools:
- Generates schemas automatically from type hints.
- Enforces type safety and input validation.
- Uses docstrings as tool descriptions.
- Surfaces exceptions back to the AI cleanly.
Read Tool (read_document)
def read_document(doc_id: str = Field(description="Id of the document to read")):
    if doc_id not in docs:
        raise ValueError(f"Document {doc_id} not found")
    return docs[doc_id]
Understanding the MCP Client Architecture
Client Initialization (__init__)
- Stores the command used to launch the MCP server.
- Supports optional environment variables for isolation.
- Uses
AsyncExitStackto manage resources and cleanup. - Delays connection setup until actually needed.
Stdio Transport (connect method)
Process Setup
server_params = StdioServerParameters(
    command=self._command,
    args=self._args,
    env=self._env,
)- Defines how the server process should start.
- Passes arguments for configuration.
- Runs with controlled environment variables.
Transport Layer
stdio_transport = await self._exit_stack.enter_async_context(
    stdio_client(server_params)
)- Launches and manages the server process.
- Sets up bidirectional stdin/stdout pipes.
- Recovers from crashes automatically.
- Cleans up processes when done.
Session Management (ClientSession)
_stdio, _write = stdio_transport
self._session = await self._exit_stack.enter_async_context(
    ClientSession(_stdio, _write)
)
await self._session.initialize()_stdiofor reading,_writefor writing.- Handles JSON-RPC serialization and parsing.
- Initializes handshake to sync state.
- Confirms the server is ready before use.
Async Context Manager
- Entry (
__aenter__): Connects automatically when used withasync with, returns self, handles errors cleanly. - Exit (
__aexit__): Always closes connections, kills stray processes, and frees resources.
Session Access (session method)
- Validates the connection before returning.
- Provides clear errors if not connected.
- Returns a typed
ClientSessionfor IDE support.
Tool Discovery (list_tools)
- Queries the server for available tools.
- Retrieves schemas and documentation.
- Adapts to servers whose capabilities change over time.
Communication Flow
- Client launches server as a subprocess.
- Sets up stdin/stdout streams.
- Performs protocol handshake.
- Server advertises tools, resources, and prompts.
- Client sends JSON-RPC requests, server responds.
- Both handle malformed messages and failures.
- Client shuts down the server cleanly on exit.
This design hides the messy parts of process and protocol management, giving you a reliable, efficient client–server bridge.
Creating the MCP Client
Now we need a client to connect to our MCP server. This client handles all the complex communication details and provides a clean interface for our application:
import sys
from contextlib import AsyncExitStack
from mcp import ClientSession, StdioServerParameters, types
from mcp.client.stdio import stdio_client
from typing import Optional, Any
import json

class MCPClient:
    def __init__(self, command: str, args: list[str], env: Optional[dict] = None):
        self._command = command
        self._args = args
        self._env = env
        self._session: Optional[ClientSession] = None
        self._exit_stack: AsyncExitStack = AsyncExitStack()

    async def connect(self):
        server_params = StdioServerParameters(
            command=self._command,
            args=self._args,
            env=self._env,
        )

        stdio_transport = await self._exit_stack.enter_async_context(
            stdio_client(server_params)
        )

        _stdio, _write = stdio_transport
        self._session = await self._exit_stack.enter_async_context(
            ClientSession(_stdio, _write)
        )
        await self._session.initialize()

    def session(self) -> ClientSession:
        if self._session is None:
            raise ConnectionError("Client not connected")
        return self._session

    async def list_tools(self) -> list[types.Tool]:
        result = await self.session().list_tools()
        return result.tools

    async def __aenter__(self):
        await self.connect()
        return self

    async def __aexit__(self, exc_type, exc_val, exc_tb):
        await self._exit_stack.aclose()
Let’s update our main application to use the MCP client:
MCP Client Architecture
Init (__init__)
- Stores server command + env vars.
- Uses
AsyncExitStackfor cleanup. - Connects lazily.
Connect (connect)
- Launches server process with
StdioServerParameters. - Sets up stdin/stdout transport.
- Manages crashes + cleanup automatically.
Session (ClientSession)
- Handles JSON-RPC read/write.
- Runs handshake to sync state.
- Ensures server is ready.
Context Manager
__aenter__: auto-connects.__aexit__: closes + kills processes safely.
Extras
session(): validates + returns session.list_tools(): discovers tools + schemas.
import asyncio
import os
from dotenv import load_dotenv
from contextlib import AsyncExitStack

from core.chat import Chat
from mcp_client import MCPClient

load_dotenv()

async def main():
    command = "uv"
    args = ["run", "mcp_server.py"]

    async with AsyncExitStack() as stack:
        # Connect to MCP server
        doc_client = await stack.enter_async_context(
            MCPClient(command=command, args=args)
        )

        # Initialize chat with MCP client
        chat = Chat(clients={"doc_client": doc_client})

        print("🤖 MCP Chat Ready!")
        print("Try: 'What documents do you have access to?'")
        print("Or: 'Read the financial report'")
        print("Type 'quit' to exit\n")

        while True:
            try:
                user_input = input("> ").strip()

                if user_input.lower() in ['quit', 'exit']:
                    break

                if not user_input:
                    continue

                print("\nAI: ", end="", flush=True)
                async for event in chat.run(user_input):
                    if event.get("event") == "on_chat_model_stream":
                        chunk = event.get("data", {}).get("chunk")
                        if chunk and hasattr(chunk, 'content'):
                            print(chunk.content, end='', flush=True)
                print("\n")

            except KeyboardInterrupt:
                break

        print("👋 Goodbye!")

if __name__ == "__main__":
    asyncio.run(main())
Now test it out:
uv run main.py
Basic chat with tools
Amazing! Your AI can now read and edit documents. But we can make it even better by adding Resources for data access consistent behavior.
Enriching chat interface with Resources
Now we have the barebones working , now for the wrap up lets implemente auto suggestions, This is something that is observed in all the AI tools. For keeping it simple in our case for enhancing the user experience we will make it so that when user types @ he gets an auto suggestion for the documents available.
Lets import the necessary libraries
from prompt_toolkit import PromptSession
from prompt_toolkit.completion import Completer, Completion
from prompt_toolkit.key_binding import KeyBindings
Now we will create a custom completer class that will fetch the document names from the MCP server and provide them as suggestions when user types @
class DocumentCompleter(Completer):
    def __init__(self):
        self.documents = []

    def update_documents(self, documents):
        self.documents = documents

    def get_completions(self, document, complete_event):
        # Detects when user types @ and shows document suggestions
        if "@" in text_before_cursor:
            # Finds text after the last @
            # Shows matching documents based on what user has typed
Now lets update the mainfunction to use this completer and fetch documents from MCP server
  completer = DocumentCompleter()
  kb = KeyBindings()

  @kb.add("@")
  def _(event):
      # Triggers autocomplete when @ is pressed
      buffer.start_completion(select_first=False)
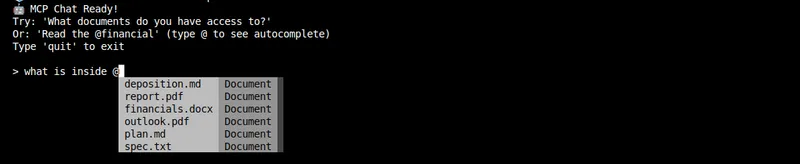
Auto-completion in action
Key features of this implementation:
- Automatic triggering: When you type @, it immediately shows completions
- Fuzzy matching: Type @fin and it will suggest financials.docx
- Real-time filtering: As you type more characters, the suggestions narrow down
- Visual feedback: Shows “Document” as metadata for each suggestion
Testing with MCP Inspector
The MCP Inspector is a fantastic tool for debugging and exploring your MCP server. Let’s use it to see what we’ve built:
# Install and run the MCP Inspector
npx @modelcontextprotocol/inspector uv run mcp_server.py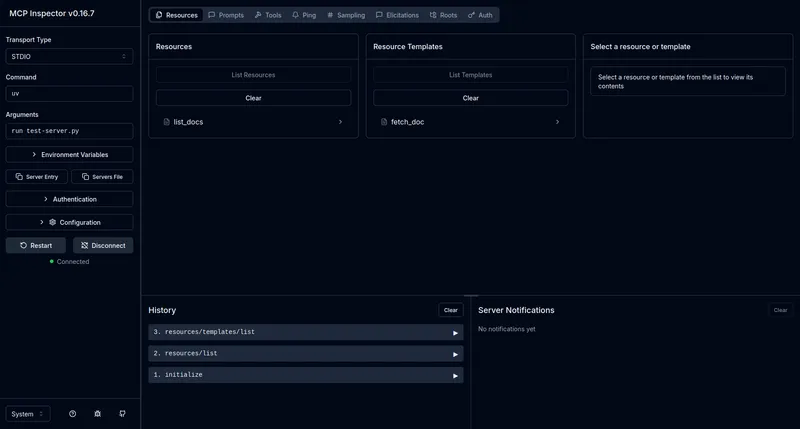
MCP Inspector Interface
This opens a web interface where you can:
- See all your tools, resources, and prompts
- Test tool calls interactively
- Explore resource URIs
- Debug your MCP implementation
The Inspector shows you exactly what your AI can see and do - it’s invaluable for development and debugging.
Your Complete MCP Application
Congratulations! You’ve built a complete MCP-powered AI application. Here’s what you’ve accomplished:
✅ Core chat system with LangChain and Gemini integration
✅ MCP server with tools for document management
✅ MCP client for seamless communication
✅ Resources for efficient data access
✅ Prompts for consistent AI behavior
✅ Inspector integration for development and debugging
The full example includes additional features like prompts, logging and reporting, CLI interface, error handling etc. You now have everything you need to build sophisticated AI applications that can actually interact with real-world data and systems.
Other helpful resources:
Learn and get certifcation from anthropic for FREE!
You May Also Like
Demystifying AWS Strands Agents: A Developer-Friendly Guide to Building AI Agents in Minutes
AWS Strands Agents is an open-source SDK that revolutionizes AI agent development by embracing a model-driven approach, allowing developers to build production-ready agents with just a few lines of code.
AG-UI Protocol: Standardizing Event-Driven Communication Between AI and UI
AG-UI (Agent-User Interaction Protocol) is an open, lightweight protocol that standardizes how AI agents connect to front-end applications, creating a seamless bridge for real-time, event-driven communication between intelligent backends and user interfaces.
Building an Advanced HTTP Request Generator for BERT-based Attack Detection
A comprehensive guide to creating a sophisticated HTTP request generator with global domain support and using it to train BERT models for real-time attack detection